OAuth2 Authentication
Providers
The following table indicates OAuth2/OpenIDConnect providers supports per Simplicité version:
| Provider | v3 | v4 | v5 | v6 |
|---|---|---|---|---|
| OpenIDConnect | No | Yes | Yes | Yes |
| Yes | Yes | Yes | Yes | |
| Microsoft | No | Yes | Yes | Yes |
| No | Yes | Yes | Yes | |
| FranceConnect | Yes | Yes (1) | Yes (1) | Yes (2) |
| KeyCloak | No | Yes (2) | Yes | Yes |
(1) FranceConnect being an OpenIDConnect-compliant provider, it should rather be configured as a generic OpenIDConnect provider instead.
(2) Only as a generic OpenIDConnect provider.
Configuration
Webapp prerequisites
Your application's URL must be exposed over HTTPS, SSL encryption is mandatory for any OAuth2/OpenIDConnect based authentication.
Skip this if you are using a standard Simplicité Docker image
If you are using our standard Docker images or our instance templates these changes are already done.
In other case, it might be necessary to:
- Remove all realm-related settings in
WEB-INF/web.xml(security-constraint, login-config and security-role tags) - Optionally remove also the realm definition in
META-INF/context.xml
Before doing these changes, make sure that you will still be able to login with a user having at least a responsibility on the ADMIN group.
In the Identity Provider
The callback URL (redirect URI) to configure in your OAuth2/OpenIDConnect identity provider for your instance is <base URL>/oauth2callback.
If needed, the logout URL to configure in your OAuth2/OpenIDConnect IdP for your instance is <base URL>/logout
or <base URL>/logoutconfirm (for displaying just a logout confirmation page).
In Simplicité
All OAuth2/OpenIDConnect providers requires at least the following settings:
name: a unique name for your providertype:oauth2client_id: your instance's client IDclient_secret: your instance's client secret
Example AUTH_PRODIDERS configuration (refer to the auth providers doc if necessary):
[
	{
		"name": "google",
		"type": "oauth2",
		"sync": true,
		"client_id": "",
		"client_secret": ""
	},
	{
		"name": "microsoft",
		"type": "oauth2",
		"sync": false,
		"client_id": "",
		"client_secret": ""
	},
	{
		"name": "linkedin",
		"type": "oauth2",
		"sync": false,
		"client_id": "",
		"client_secret": ""
	},
	{
		"name": "franceconnect",
		"type": "oauth2",
		"client_id": "",
		"client_secret": ""
	},
	{
		"name": "myoidc",
		"type": "oauth2",
		"label": "Sign in with your private IdP",
		"sync": true,
		"client_id": "",
		"client_secret": ""
	}
	{
		"name": "oidc-with-all-params",
		"type": "oauth2",
		"label": "Sign in with MyProvider",
		"sync": true,
		"visible": true,
		"client_id": "<my client ID>",
		"client_secret": "<my client secret>",
		"redirect_url": "<instance_url>/oauth2callback",
		"base_url": "https://<idp_url>",
		"authorize_url": "<base_url>/authorize",
		"token_url": "<base_url>/token",
		"userinfo_url": "<base_url>/userinfo",
		"logout_url": "<base_url>/logout",
		"tokeninfo_url": "<base_url>/tokeninfo",
		"tokeninfo_mappings": {
			"login": "user_id"
		},
		"client_credentials_mode": "authheader|params",
		"scopes": "additional_scope",
		"userinfo_mappings": {
			"login":     "username",
			"firstName": { "field": "usr_first_name" },
			"lastName":  { "field": "usr_last_name" },
			"email":     { "field": "usr_email" },
			"address":   { "field": "usr_address1" },
			"myfield":   { "field": "myUserField" },
			"myparam":   { "param": "APP_MYPARAM" },
			"title":     { "field": "usr_title", "transform": { "M.":"MR", "Mme":"MRS", "Mlle":"MS" } },
			"unit":      { "field": "myUserUnit", "param": "APP_USER_UNIT" }
		},
		/* OR
		"jwt_claims_mappings": {
			"login": "username"
			(...)
		},*/
		"jwt_issuer": "<url>",
		"jwt_secret": "",
		"jwt_check_nonce": true
	}
	(...)
]
For historical reasons the names google, microsoft and linkedin are reserved as they correspond to dedicated connectors.
To use the generic OpenIDConnect connector you must use another name (such as the myoidc of the above example).
The FranceConnect provider is a OIDC-compliant provider, its management as a dedicated provider has been kept till version 5 for backward compatibility but it should now be rather configured as a generic OIDC provider. It has been removed in version 6.
OpenIDConnect
To learn more about OpenIDConnect (and its relationship with OAuth2), pleaser refer its documentation.
Settings
Beyond the common OAuth2 settings, there are some additional system parameters that needs to be configured for the OIDC providers :
| Setting | Required | Comments | Availability |
|---|---|---|---|
base_url | required, unless authorize_url, token_url and userinfo_url are defined | / | v4.0 |
authorize_url | required, unless base_url is defined | defaults to base_url/authorize | v4.0 |
token_url | required, unless base_url is defined | defaults to base_url/token | v4.0 |
userinfo_url | required, unless base_url is defined | defaults to base_url/userinfo | v4.0 |
redirect_url | optional | defaults to instance_url/oauth2callback | v4.0 |
client_credentials_mode | optional | defaults to authheader for Basic (Authorization header), should be params for HTTP POST method | v4.0 |
userinfo_mappings | optional | user info fields to use as instead of standard fields defined by the OIDC standards, the value is a JSON object (e.g. { "login": "uid", "firstname": "first_name", "lastname": "last_name", "email": "email_address", "phone": "mobile_phone, "lang": "preferred_language"} to map the defaults which are respectively sub, given_name, family_name, email, phone_number and locale) | v4.0 |
tokeninfo_mappings | optional | Same as above but for a custom token info endpoint | v5.3 |
jwt_claims_mappings | optional | Same as above but for ID token claims | v5.3 |
pkce_challenge_method | optional | to enable PKCE flow, possible values are S256 or plain (if absent PKCE is disabled) | v5.2.30 |
pkce_code_verifier_length | optional | to define the length of the PKCE code verifier, defaults to 64 | v5.2.30 |
non_ssl_urls_allowed | optional | to allow using non SSL URLs (Note that this does not comply with OAuth2/OpenIDConnect standards, it should never be used unless absolutely required) | v5.2.32 |
Default scopes
By default the OIDC OAuth2 implementation uses by default the openid and profile scopes when calling user info endpoint.
Only additional scopes need to be configured using the OAUTH2_SCOPES system parameter orscopes attribute in AUTH_PROVIDERSif needed.
If for some very specific reasons you need other default scopes, you can use the OAUTH2_DEFAULT_SCOPES system parameter
or default_scopes attribute in AUTH_PROVIDERS.
In both cases the syntax for multiple scopes is space-separated.
User info mappings
By default, the relevant user info fields defined by the OIDC standards are used to update corresponding user field
(e.g. given_name for first name, family_name, etc.).
As for any OAuth2 provider it is possible to do a custom parsing of user info response in the postLoadGrant grant hook as described above.
For instance here is a Keycloak integration configuration for AUTH_PROVIDERS:
{
	"name": "keycloak",
	"type": "oauth2",
	"label": "Sign in with Keycloak OAuth2 IdP",
	"sync": true,
	"visible": true,
	"client_id": "<my client ID>",
	"client_secret": "<my client secret>",
	"authorize_url": "https://<host:port>/auth/realms/<myrealm>/protocol/openid-connect/auth",
	"token_url": "https://<host:port>/auth/realms/<myrealm>/protocol/openid-connect/token",
	"userinfo_url": "https://<host:port>/auth/realms/<myrealm>/protocol/openid-connect/userinfo",
	"logout_url": "https://<host:port>/auth/realms/<myrealm>/protocol/openid-connect/logout",
	"userinfo_mappings": {
		"login":     "username",
		"firstname": "firstName",
		"lastname":  "lastName",
		"email":     "email"
	}
}
userinfo_mappings is used to map simple fields during synchronization (when global system parameter USER_SYNC is enabled), as of version 5
it is possible to specify additional mappings hints:
field: optional to set a User's field with the userinfo valuetransform: optional to change the value with a local code of List of valuesparam: optional to add a user's system parameter
Example:
	"userinfo_mappings": {
		"login":     "username",
		"firstName": { "field": "usr_first_name" },
		"lastName":  { "field": "usr_last_name" },
		"email":     { "field": "usr_email" },
		"address":   { "field": "usr_address1" },
		"myfield":   { "field": "myUserField" },
		"myparam":   { "param": "APP_MYPARAM" },
		"title":     { "field": "usr_title", "transform": { "M.":"MR", "Mme":"MRS", "Mlle":"MS" } },
		"unit":      { "field": "myUserUnit", "param": "APP_USER_UNIT" }
	}
As of version 5, it is possible to proceed with additional JWT token processing using jwt_* settings described below.
Token validation
As of version 5, it is possible to use external authentication tokens on the API endpoint. Some additional configuration
is required in the AUTH_PROVIDERS system parameter depending on the (exclusive) validation method of the token:
JWT validation
JWT token validation is enabled by adding the following attributes:
jwt_issuer, required: JWT token issuerjwt_secret, optional: JWT token signature secretjwt_claims_mappings, optional:": JWT token's payload claims mappings (e.g.{ "login": "preferred_username" })jwt_check_nonce, optional:": Check JWT token's nonce, defaults tofalse
Token info URL validation
Token validation using token info URL is enabled by adding the following attributes:
tokeninfo_url, required: Token info URLtokeninfo_mappings, optional: Token info result mappings (e.g.{ "login": "preferred_username" })
Custom token validation
Token validation using the getAuthTokenInfo hook in PlatformHooks.
With the following provider added to AUTH_PROVIDERS :
{
	"name":"my_custom_provider", "type":"oauth2", "visible":false,
	"tokeninfo_mappings" : {
		"login": "my_mapped_login",
		"expiry": "my_mapped_expiry",
		"valid": "my_mapped_valid"
	}
}
The following example performs an HTTP call to get the token info :
@Override
public String getAuthTokenInfo(String token) {

	String url = "validation.url"

	String[] headers = new String[] {
		"Content-Length: 157",
		"Content-Type: application/x-www-form-urlencoded"
	};

	Map<String, String> p = new HashMap<>();
	p.put("client_id", "my_client_id");
	p.put("client_secret", "my_client_secret");
	p.put("token", token);

	try {
		String res = Tool.readUrl(url, null, null, "POST", p, headers, "UTF-8");
		// ...
		// handle result
		// ...
		return res; // containing the mapped attributes login, expiry, valid

	}
	catch (Exception e) {
		AppLog.error(e, null);
		return null;
	}
}
Specific providers
Google
Register a new client ID on the Google Developers Console for the application:
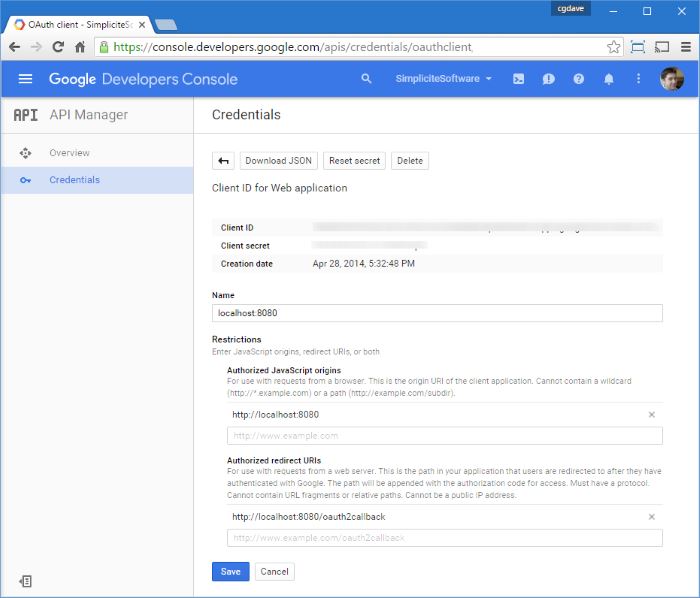
Activate the required Google+ API on Google Developers Console and, optionally, activate any other Google API that you would like to call with the auth token your users get from Google authentication.
Optionally set OAUTH2_SCOPES <Google provider name> with additional OAuth2 scopes you may need (e.g. drive scopes, calendar scopes, ...)
see Google documentation for the values of the possible scopes, if you have several scopes use space as separator.
In AUTH_PROVIDERS just add Google settings as follow, for example to add consent to access User's drive files:
{
  "name": "google",
  "type": "oauth2",
  "label": "Sign in with Google",
  "client_id": "xxxxx.apps.googleusercontent.com",
  "client_secret": "xxxxx",
  "scopes": "https://www.googleapis.com/auth/drive.file",
  "sync": true,
  "visible": true
}
By default the Google OAuth2 implementation uses the profile and email scopes when calling the user info endpoint.
Only additional scopes needs to be configured.
In 3.x versions you have a unique provider so the <Google provider name> suffix must not be set
Microsoft LiveID
Register a new client ID on the Microsoft LiveID application portal for the application
(the OAuth2 callback URL will be <url>/oauth2callback):
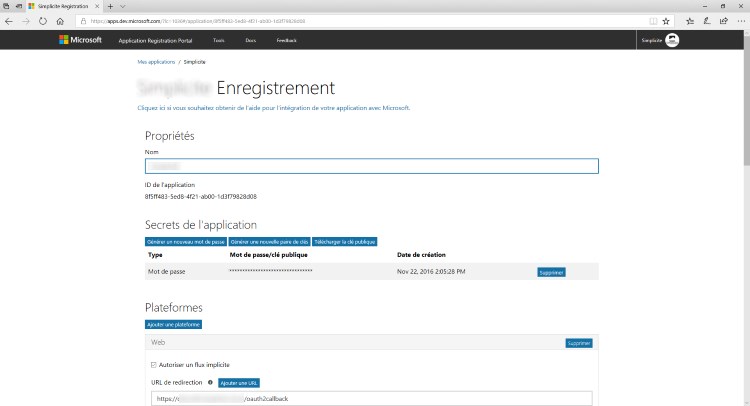
Activate the required User.Read on the portal and, optionally, activate any other Microsoft API that you would like to call with the auth token your users get from Microsoft authentication.
Optionally set OAUTH2_SCOPES <Microsoft LiveID provider name> with additional OAuth2 scopes you may need
see Microsoft LiveID documentation for the values of the possible scopes, if you have several scopes use space as separator.
LinkedIn
{
  "name": "linkedin",
  "type": "oauth2",
  (...)
}
KeyCloak
{
  "name": "keycloak-1",
  "type": "oauth2",
  (...)
}
The name of KeyCloak does not necessary have to be keycloak, it just has to start with that string.
This is so there can be multiple keycloak providers.
This provider adds specific KeyCloak functionality like user info group mapping, users/roles/groups synchronization, etc.
Refer to the dedicated Keycloak documentation for details.
Platform hooks
If needed you can implement additional business logic in the GrantHooks Java class or Rhino script.
The following example checks and removes the domain part of the account name in the parseAuth hook
and creates/updates the corresponding application user with responsibilities on MYAPP_GROUP1 and MYAPP_GROUP2 groups
on the fly in the preLoadGrant hook:
@Override
public String parseAuth(Grant sys, SessionInfo info) {
	if (AuthTool.useOAuth2()) {
		// Example of domain verification
		String domain = Grant.getSystemAdmin().getParameter("MY_OAUTH2_DOMAIN", "");
		String auth = info.getLogin();
		if (!Tool.isEmpty(domain)) {
			AppLog.info("OAuth2 account = " + auth, sys);
			if (Tool.isEmpty(auth) || !auth.matches("^.*@" + domain + "$")) {
				AppLog.info("OAuth2 error: Invalid domain for " + auth, sys);
				return ""; // ZZZ must return empty string, not null, to tell the auth is rejected
			}
			AppLog.info("OAuth2 valid domain for " + auth + " = " + domain, sys);
		}
		/* //and/or
		// Example of user verification
		String uid = Grant.getSystemAdmin().simpleQuery("select row_id from m_user where usr_login = '" + auth + "' and usr_active = '1'");
		if (Tool.isEmpty(uid)) {
			AppLog.info("OAuth2 error: No active user for " + auth, sys);
			return ""; // ZZZ must return empty string, not null, to tell the auth is rejected
		}
		AppLog.info("OAuth2 active user ID for " + auth + " = " + uid, sys);
		*/
	}
	return super.parseAuth(sys, info);
}

@Override
public void preLoadGrant(Grant g) {
	if (AuthTool.useOAuth2() &&  (!Grant.exists(g.getLogin(), false))){
		// Example of business logic to create users on the fly
		ObjectDB usr = null;
		try {
			// Create user if not exists
			// ZZZ An isolated object **MUST** be explicitly destroyed in the finally block (see below) ZZZ
			usr = Grant.getSystemAdmin().getIsolatedObject("User");
			usr.setRowId(ObjectField.DEFAULT_ROW_ID);
			usr.resetValues(true);
			usr.setStatus(Grant.USER_ACTIVE);
			usr.getField("usr_login").setValue(g.getLogin());
			new BusinessObjectTool(usr)/* or usr.getTool() in version 5+ */.validateAndCreate();

			// Get module in which user has been created (default module for users)
			String module = usr.getFieldValue("row_module_id.mdl_name");
			AppLog.info("OAuth2 user " + g.getLogin() + " created in module " + module,g);
			// Force a random password to avoid the change password popup

			usr.invokeMethod("resetPassword", null, null);

			// Add responsibilities on designated groups
			String[] groups = { "MYAPP_GROUP1", "MYAPP_GROUP2"};
			for(String group : groups){
				Grant.addResponsibility(usr.getRowId(), group, Tool.getCurrentDate(-1), "", true, module);
				AppLog.info("Added user " + group + " responsibility for OAuth2 user " + g.getLogin(),g);
			}
		} catch (MethodException | CreateException | ValidateException e) {
			AppLog.error(e, g);
		} finally {
			// ZZZ An isolated object **MUST** always be explicitly destroyed ZZZ
			if (usr != null)
				usr.destroy();
		}
	}
	super.preLoadGrant(g);
}
Customizing the login screen
If you want to change the top logo you can create a OAUTH2_LOGO image resource (ideal type = SVG and ideal dimension = 120x120 px)
If you wat to change some of the styles of the login screen you can add a OAUTH2_STYLES CSS resource, for instance for a dark scheme:
.auth-signin { background-color: #152935; }
.auth-signin-with img, .auth-signin button { border: none 0; box-shadow: 5px 5px 10px #3A3A3A; }
.auth-signin-form { background-color: #394b54; box-shadow: 5px 5px 10px #131b21; border: solid 1px #152935; }
.auth-signin-version { color: #C0C0C0; }
.auth-signin-fp a { color: #D0D0D0; }
For each OAuth2 provider you can create a custom OAUTH2_SIGNIN_<uppercase provider name, e.g. MYPROVIDER> image resource.