Simplicité with Portainer & Traefik
Portainer is a container management platform that enables efficient deployment and operation of Docker containers. This document demonstrates how to use Portainer to deploy Simplicité instances with automated configuration and management.
- minimal manual configuration
- SSL certificates auto-setup with Let's Encrypt at
my-simplicite-app.my.domain - HTTP -> HTTPS redirection
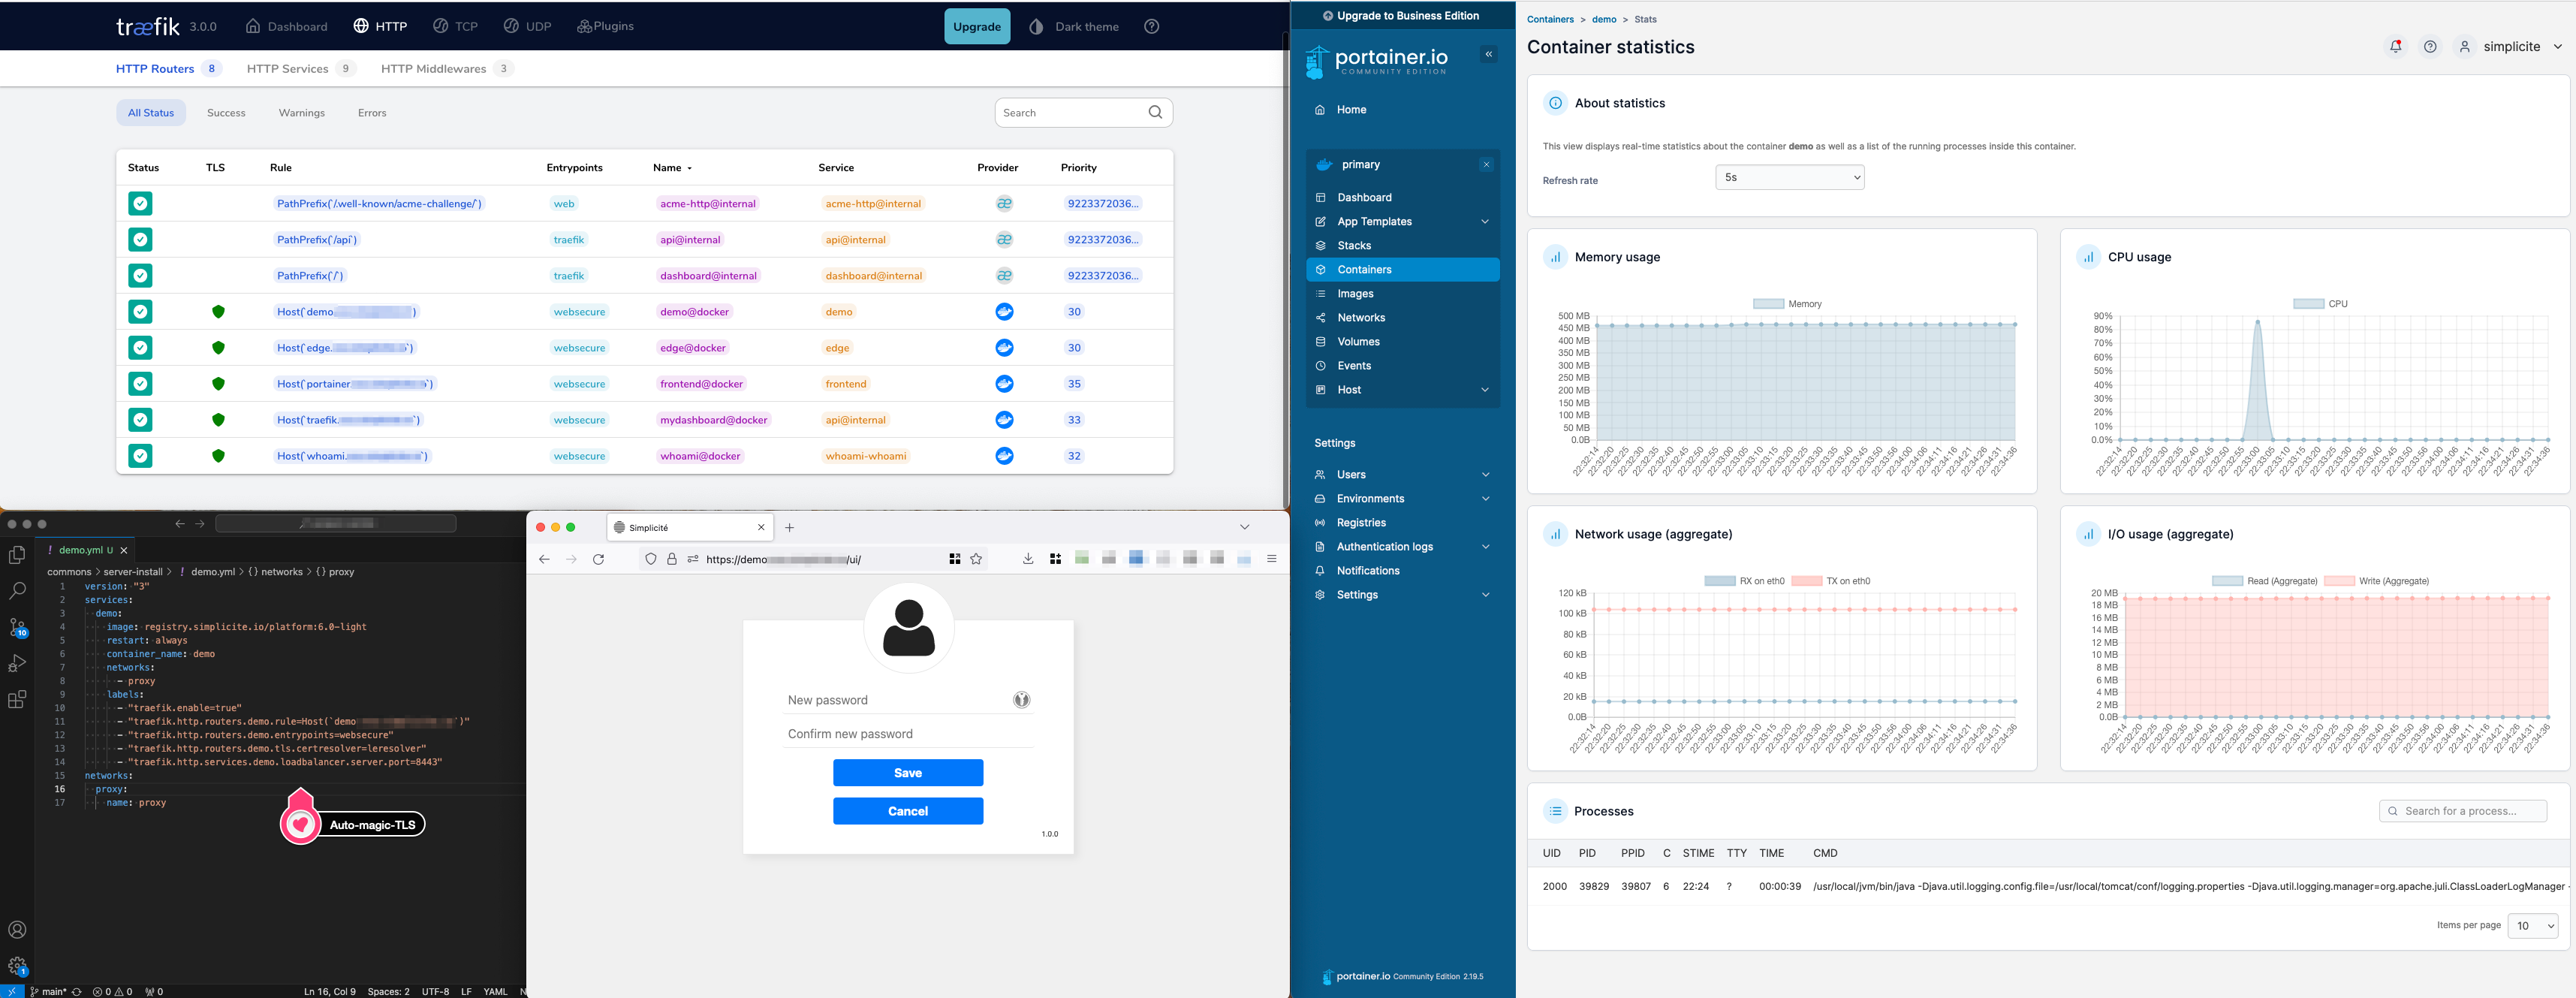
- Traefik's reverse proxy dashboard activated and available at
traefik.my.domainbehind basic auth - Portainer available at
portainer.my.domain - allow remote debugging
The whole installation process can be done in under 30 minutes.
For on premise environments, many adaptations should be done to this doc:
- registry proxy
- let's encrypt alternative, or http-only configuration
- custome app templates
- etc
Those adaptations are out of scope of this document.
1 - Requirements
Simplicité images access
No matter the infrastructure, to deploy Simplicité images, access to a registry serving those images is mandatory. In most cases, Simplicité's official registry should be used. Check credentials by connecting to the registry's UI.
Server
As of February 2026, there are compatibility problems between Almalinux 10 and Docker, prefer Almalinux 9 instead.
The following commands have been tested on Almalinux 9, which is the OS we use and recommend.
Non RHEL-compatible unix OS will need some command adaptations (dnf -> apt etc.).
Sizing of the server should be made according to the needs, see Sizing doc if necessary. The minimal recommended configuration would be:
- 2 vCores
- 4 GB
- 50 GB storage
- 250 Mbit bandwidth
- your SSH key
Wildcard domain
A wildcard DNS record configured on the server's IP adress.
*.<my-app-server.my-domain.com> IN A <IP adress>
This domain is used for all services:
- SSH connection :
ssh.my-app-server.my-domain.com(a subdomain likessh.my-app...oranything.my-app...is needed because the DNS record is configured with the wildcard) - Portainer access :
https://portainer.my-app-server.my-domain.com - Traefik access :
https://traefik.my-app-server.my-domain.com - Deployed apps :
https://test-instance.my-app-server.my-domain.com
Once configured, SSH connect to the server using the domain name (not the IP), to make sure it is configured properly.
ssh almalinux@ssh.my-app-server.my-domain.com
2 - System configuration
Firewall
Install a local firewall with HTTP, HTTPS and SSH enabled. is highly recommended, for instance by issuing the following commands:
sudo dnf -y install firewalld && sudo dnf clean all
sudo systemctl enable firewalld
sudo systemctl start firewalld
sudo firewall-cmd --add-service=ssh --permanent
sudo firewall-cmd --add-service=http --permanent
sudo firewall-cmd --add-service=https --permanent
sudo firewall-cmd --remove-service=cockpit --permanent
sudo firewall-cmd --reload
The configuration is verifiable with sudo firewall-cmd --list-all
System time
Adjust the system date and timezone.
sudo timedatectl set-timezone Europe/Paris
SSH connection method
By default, password authentication should be disabled on almalinux if you deployed your server with a SSH key. Check your configuration and update it if necessary.
sudo sshd -T | grep passwordauthentication
System updates
The system must be up-to-date before proceeding, and portainer needs SELinux to be disabled:
sudo dnf update -y
sudo sed -i 's/SELINUX=enforcing/SELINUX=disabled/g' /etc/selinux/config
sudo reboot
The system must be kept up-to-date by either executing the above command regularly, or by setting up automatic updates. If you activate automatic reboot, make sur you have some kind of VM backup setup.
sudo dnf install dnf-automatic -y
sudo sed -i 's/^reboot=.*/reboot=when-needed/' /etc/dnf/automatic.conf
sudo systemctl enable --now dnf-automatic.timer
- edit automatic updates execution time (defaults to 6am) with
sudo systemctl edit --full dnf-automatic.timer - if there are any problems with automatic updates, logs should be available through
sudo journalctl -u dnf-automatic.service
3 - Docker Install
Portainer needs Docker as a requirement, so it will be installed after usual upgrades. Based on docker CentOS install docs (adapted)
sudo dnf config-manager --add-repo=https://download.docker.com/linux/centos/docker-ce.repo
sudo dnf install -y docker-ce docker-ce-cli containerd.io docker-buildx-plugin docker-compose-plugin
sudo systemctl start docker
sudo systemctl enable docker
sudo usermod -aG docker almalinux # add your current user to docker group
exit # we need to exit and log back in for the docker group to take effect
Check that everything runs smooth
docker run hello-world # check everything is running smoothly
4 - Portainer install with lets encrypt and traefik
This is an adaptation of Portainer's doc "Deploying Portainer behind Traefik Proxy"
Portainer configuration directory
The configuration basically needs 3 files:
- the docker compose configuration for portainer and traefik
- the variables for this configuration in an
.envfile - an
acme.jsonfile for Let's encrypt to work with
mkdir portainer-and-traefik
cd portainer-and-traefik
touch .env
touch docker-compose.yml
touch acme.json
chmod 600 acme.json
Portainer variables
Do not use the following configuration as is, make sure to adapt all variables.
Create and adapt the following file with vi .env
WILDCARD_DOMAIN="my.domain" # wildcard domain (*.my.domain) configured on this server's IP, WITHOUT the wildcard
ACME_MAIL="mail@my.domain" # email for the generation of SSL certificates with Let's Encrypt.
TRAEFIK_DASHBOARD_ACTIVE="true"
TRAEFIK_DASHBOARD_BASICAUTH="user_name:http-basic-auth-pwd" # cf tip below
To generate the basic auth user / pwd, you can use the following command line (doubling the $ is required)
htpasswd -bn your_user_name your_super_complex_password | sed 's/\$/$$/g'
Portainer compose file
Copy and paste the configuration with vi docker-compose.yml
services:
  traefik:
    container_name: traefik
    image: "traefik:latest"
    restart: unless-stopped
    ports:
      - "80:80"
      - "443:443"
    networks:
      - proxy
    volumes:
      - "/var/run/docker.sock:/var/run/docker.sock:ro"
      - "./acme.json:/acme.json"
    command:
      - --api.insecure=true
      - --api.dashboard=${TRAEFIK_DASHBOARD_ACTIVE}
      - --entrypoints.web.address=:80
      - --entrypoints.web.http.redirections.entrypoint.to=websecure
      - --entryPoints.web.http.redirections.entrypoint.scheme=https
      - --entrypoints.websecure.address=:443
      - --entrypoints.websecure.asdefault=true
      - --log.level=INFO
      - --accesslog=true
      - --providers.docker
      - --providers.docker.network=proxy
      - --providers.docker.exposedByDefault=false
      - --providers.docker.defaultRule=Host(`{{ index .Labels "simplicite.subdomain"}}.${WILDCARD_DOMAIN}`)
      - --certificatesresolvers.leresolver.acme.httpchallenge=true
      - --certificatesresolvers.leresolver.acme.email=${ACME_MAIL}
      - --certificatesresolvers.leresolver.acme.storage=./acme.json
      - --certificatesresolvers.leresolver.acme.httpchallenge.entrypoint=web
    labels:
      - traefik.enable=true
      - traefik.http.routers.mydashboard.rule=Host(`traefik.${WILDCARD_DOMAIN}`)
      - traefik.http.routers.mydashboard.tls.certresolver=leresolver
      - traefik.http.routers.mydashboard.entrypoints=websecure
      - traefik.http.routers.mydashboard.service=api@internal
      - traefik.http.routers.mydashboard.middlewares=myauth
      - traefik.http.middlewares.myauth.basicauth.users=${TRAEFIK_DASHBOARD_BASICAUTH}
  portainer:
    image: portainer/portainer-ce:latest
    command: -H unix:///var/run/docker.sock
    restart: unless-stopped
    networks:
      - proxy
    volumes:
      - /var/run/docker.sock:/var/run/docker.sock
      - portainer_data:/data
    labels:
      # Frontend
      - "traefik.enable=true"
      - "traefik.http.routers.frontend.rule=Host(`portainer.${WILDCARD_DOMAIN}`)"
      - "traefik.http.routers.frontend.entrypoints=websecure"
      - "traefik.http.services.frontend.loadbalancer.server.port=9000"
      - "traefik.http.routers.frontend.service=frontend"
      - "traefik.http.routers.frontend.tls.certresolver=leresolver"
      # Edge
      - "traefik.http.routers.edge.rule=Host(`edge.${WILDCARD_DOMAIN}`)"
      - "traefik.http.routers.edge.entrypoints=websecure"
      - "traefik.http.services.edge.loadbalancer.server.port=8000"
      - "traefik.http.routers.edge.service=edge"
      - "traefik.http.routers.edge.tls.certresolver=leresolver"
networks:
  proxy:
    name: proxy
volumes:
  portainer_data:
The Traefik container and the Simplicité instances have to run in the same Docker network, that's why a "proxy" network is created where all containers will be placed.
Portainer start
Running the start command will fetch images, start containers, get certificates, etc.
docker compose up -d
Verify that you have access to traefik.my.domain and portainer.my.domain
5 - Configure Portainer
Portainer admin user
Access https://portainer.my.domain right after starting the service
It's only configurable for a limited amount of time
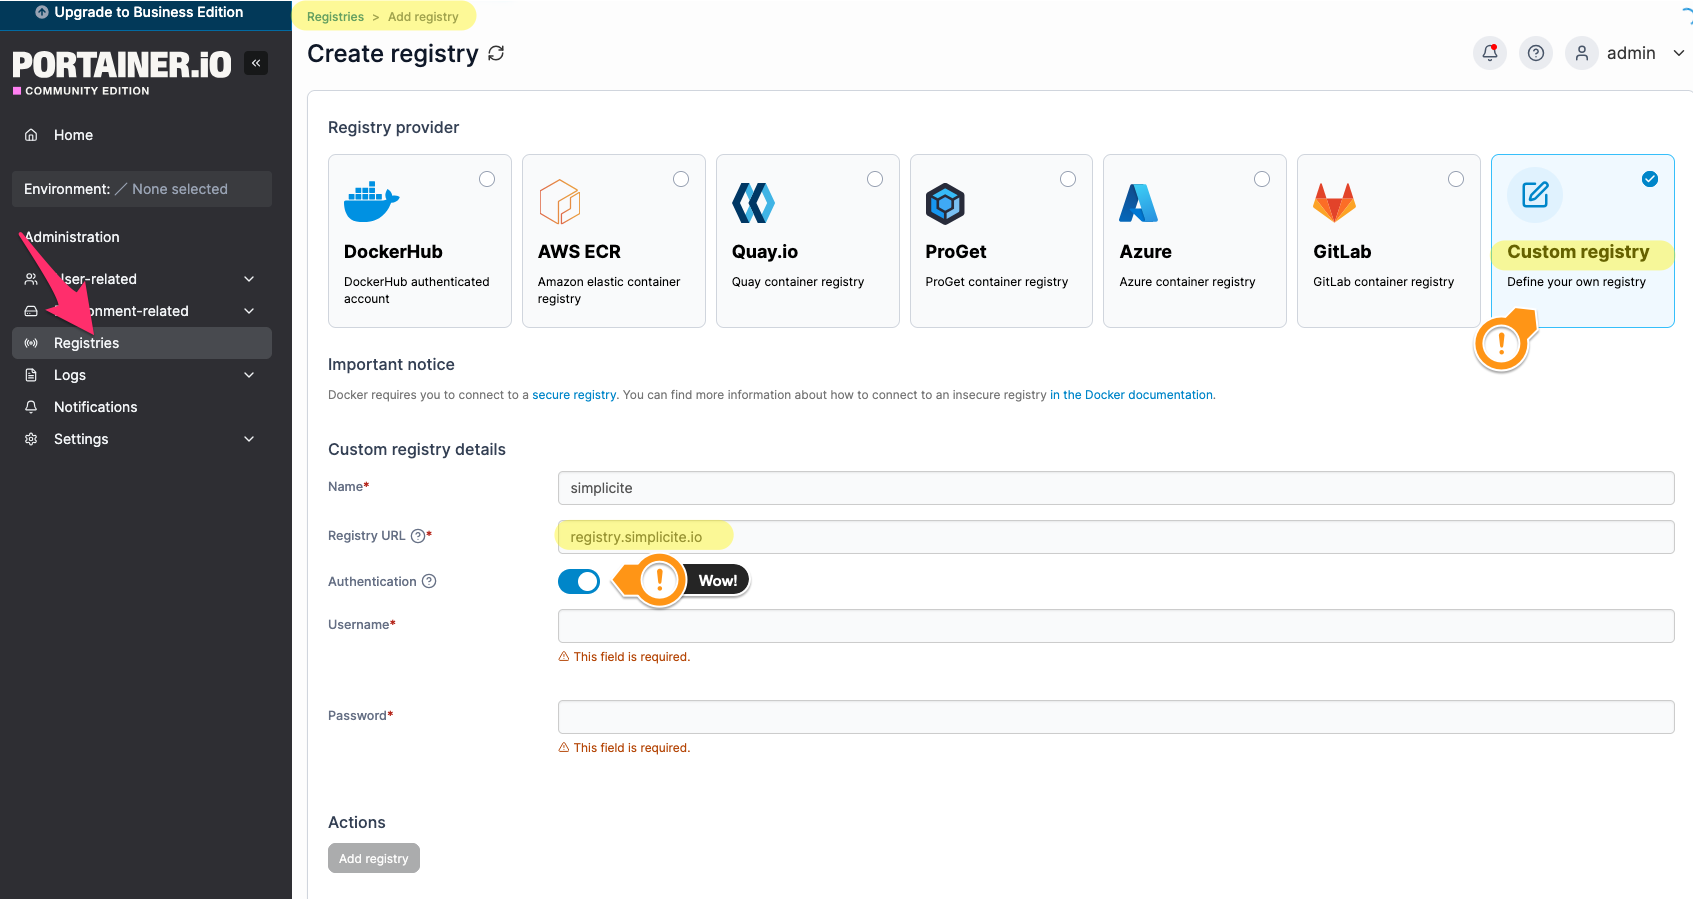
Simplicité registry
Go to Administration > Registries and create a Custom Registry with your dedicated Simplicité registry user and password
mentioned in the requirements.
(Reminder: you can check your credentials work by testing them on registry-ui)
registry.simplicite.io
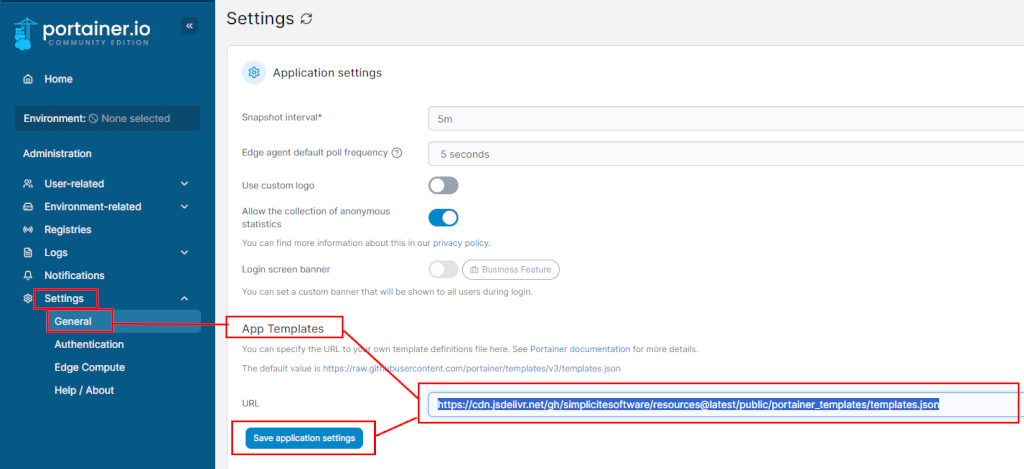
Docker compose Simplicité templates
Go to Administration > Settings > General and configure App Templates with the Simplicité Templates:
https://cdn.jsdelivr.net/gh/simplicitesoftware/resources@latest/public/portainer_templates/templates.json
6 - Start a Simplicité instance
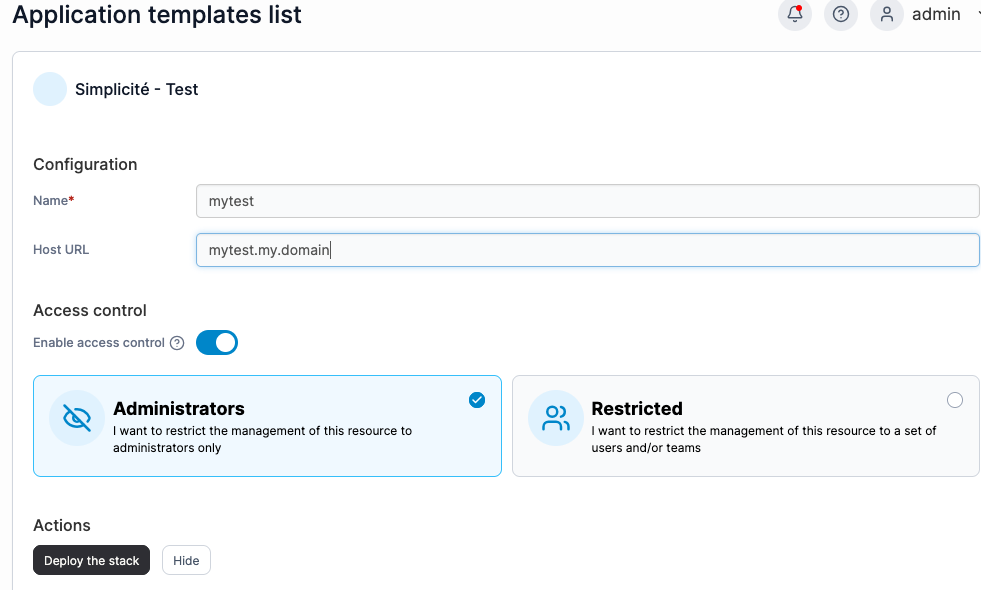
From templates
Select an app template (click on the line) or customize a template ("copy as custom"):
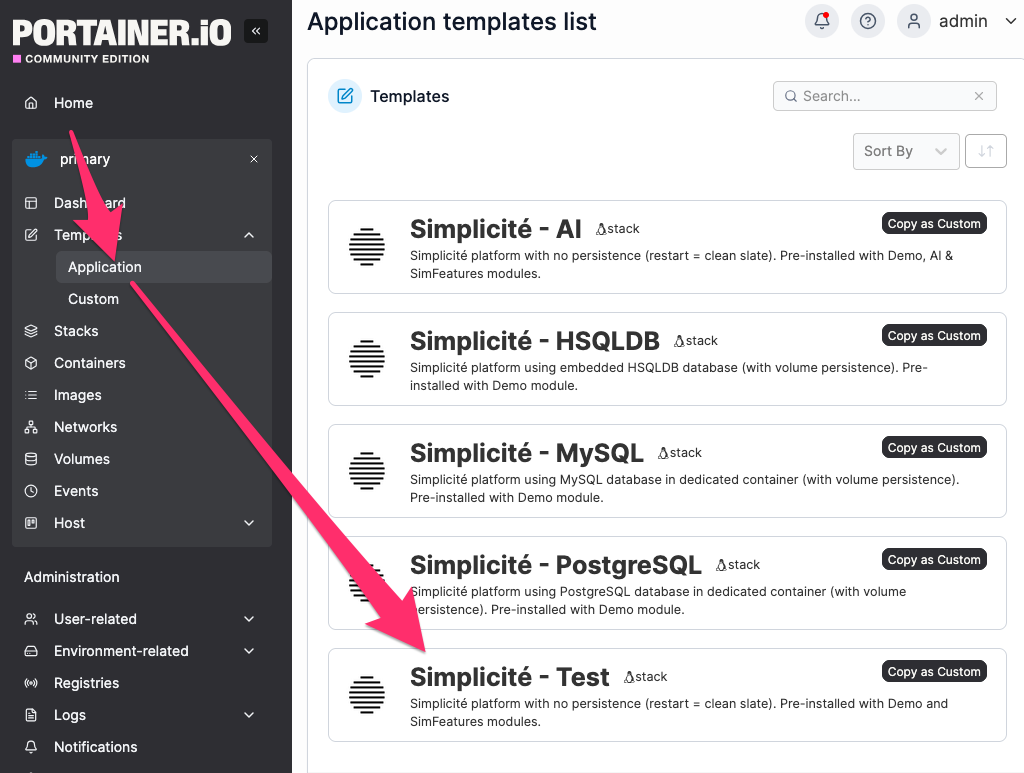
And then fill the values (the host URL must correspond to the wildcard domain for let's encrypt to work as intended)
From stacks
- take a look at the templates on Github
- Go to Stacks (effectively docker compose configurations) > Add stack
JPDA Remote debugging
To enable JPDA remote debugging add the following environment variables and open an access to port 8000.
Assign a different port to each instance (8001, 8002, 8003...).
services:
  test:
    (...)
    ports:
      - 8001:8000 # expose port 8000
    environment:
      (...)
      JPDA: "true"
      JPDA_SUSPEND: "<y|n, defaults to n>" # true to wait for debugger
    (...)
At the moment, there seems to be no way of routing VSCode's JPDA packets over traefik. Our only option is thus to expose the port directly, without going through traefik. Remember that there is a firewall installed, and it might need configuration.
VSCode tools
To use developer mode for development-oriented features and
for the Simplicité VSCode tools extension,
add the following DEV_MODE environment variable.
services:
  test:
    (...)
    environment:
      (...)
      DEV_MODE: true
      (...)
Backups
Temporality
Be mindfull of execution times: VM backups might abort instance backups, which might abort the app's processes (the app usually needs to be stopped make an instance backup).
| Comment | Recommended time | Execution control | |
|---|---|---|---|
| App daily executions | 12am | Simplicité | |
| Instance backups | Example events where you might need a backup: Bad upgrade, catastrophic Simplicité configuration choices, bad file manipulation, database corruption, etc. | 2am | Server crontab |
| Instance backups backups | It's good practice to backup the instance backups on another server, making sure it's in another region, in the event of catastrophic datacenter-level accidents. | 2am | Server crontab |
| VM Backups | Periodical VM backups are recommended, especially when automatic system updates are enabled. | 4am | VM Provider |
| System update | Happens after VM backups | 6am | Server dnf-automatic |
Backup script
This is a backup script example for a Simplicité + PostgreSQL stack.
Each backed up project uses a variables-definitions backup-myproject.sh script that call a unified backup.sh script.
backup-myproject.sh should be called by cron (crontab -e).
0 2 * * * /home/almalinux/backups/backup-myapp.sh 1>/dev/null 2>&1
See scripts
backup-myproject.sh script:
#!/bin/bash
set -euo pipefail

### PROJECT VARIABLES

BACKUP_ROOT="/home/almalinux/backups"

# --- portainer stack info
COMPOSE_PROJECT="xxx"
APP_SERVICE="xxx"
APP_DBDOC_VOLUME="xxx"
PSQL_SERVICE="xxx"
PSQL_DBNAME="xxx"
PSQL_DBUSER="xxx"

# --- Minimum free space required
THRESHOLD_GB=20
MOUNTPOINT="/"
MAIL_TO="xxx"

{
    echo "===== Backup run $(date) ====="
    source "$(dirname "$0")/backup.sh"
    # optionally, send $TGZ to an object storage
    echo "===== Done ====="
} 2>&1 | tee -a "$BACKUP_ROOT/backup-$COMPOSE_PROJECT.log"
backup.sh script:
#!/bin/bash

set -euo pipefail

echo "🤖 Running backup.sh"

# --- Required variables ---
REQUIRED_VARS=(
    BACKUP_ROOT
    COMPOSE_PROJECT
    APP_SERVICE
    APP_DBDOC_VOLUME
    PSQL_SERVICE
    PSQL_DBNAME
    PSQL_DBUSER
    THRESHOLD_GB
    MOUNTPOINT
    MAIL_TO
)

MISSING=()
for VAR in "${REQUIRED_VARS[@]}"; do
    # The “-” avoids unbound variable errors under `set -u`
    if [[ -z "${!VAR-}" ]]; then
        MISSING+=("$VAR")
    fi
done

if (( ${#MISSING[@]} > 0 )); then
    echo "❌ Error: the following required variables are not set or empty:"
    for VAR in "${MISSING[@]}"; do
        echo "  - $VAR"
    done
    echo "Please check your configuration script before running backup.sh."
    exit 1
fi

echo "ℹ️  All required variables are defined."


# --- Get available space in GB (integer) ---
AVAILABLE_GB=$(df -BG --output=avail "$MOUNTPOINT" | tail -1 | tr -dc '0-9')

# --- Check threshold ---
if (( AVAILABLE_GB < THRESHOLD_GB )); then
    {
        echo "⚠️  Low disk space alert on $(hostname)"
        echo "Mount point: $MOUNTPOINT"
        echo "Available: ${AVAILABLE_GB}GB"
        echo "Required:  ${THRESHOLD_GB}GB minimum"
        echo "Date: $(date)"
    } > "$TMP_LOG"

    # Send email (requires mailutils / postfix / sendmail configured)
    mail -s "[ALERT] Low disk space on $(hostname)" "$MAIL_TO" < "/tmp/disk_space_check.log"

    echo "ℹ️  ALERT sent: only ${AVAILABLE_GB}GB left on $MOUNTPOINT"
    exit 1
else
    echo "ℹ️  Disk space OK: ${AVAILABLE_GB}GB available on $MOUNTPOINT"
fi


# === CONFIG & PREP ===
BACKUPNAME="${COMPOSE_PROJECT}-$(date +%Y-%m-%d_%H-%M).bak"
BACKUPDIR="${BACKUP_ROOT}/${BACKUPNAME}"
TGZ="${BACKUPNAME}.tgz"

mkdir -p "$BACKUPDIR"

echo "ℹ️  Starting backup for project: $COMPOSE_PROJECT"

# === STOP SERVICE ===
echo "ℹ️  Stopping service: $APP_SERVICE"
sudo docker compose -p "$COMPOSE_PROJECT" stop "$APP_SERVICE"

# === DATABASE DUMP ===
echo "ℹ️  Creating database dump..."
sudo docker compose -p "$COMPOSE_PROJECT" exec -T "$PSQL_SERVICE" \
  sh -c "pg_dump -U \"$PSQL_DBUSER\" \"$PSQL_DBNAME\" > /var/lib/backup/database.dump"

sudo docker compose -p "$COMPOSE_PROJECT" cp \
  "$PSQL_SERVICE:/var/lib/backup/database.dump" "$BACKUPDIR/database.dump"

# === DBDOC VOLUME COPY ===
echo "ℹ️  Backing up dbdoc volume..."
sudo docker run -v "$APP_DBDOC_VOLUME:/data" --name helper busybox true
sudo docker cp helper:/data "$BACKUPDIR/dbdoc" || true
sudo docker rm -f helper 2>/dev/null || true
sudo chown -R $USER:$USER "$BACKUPDIR"

# === RESTART SERVICE ===
echo "ℹ️  Restarting service: $APP_SERVICE"
sudo docker compose -p "$COMPOSE_PROJECT" start "$APP_SERVICE"

# === CREATE ARCHIVE ===
echo "ℹ️  Creating archive..."
cd "$BACKUP_ROOT"
tar -czf "$TGZ" "$BACKUPNAME"
rm -rf "$BACKUPNAME"

echo "✅ Backup completed successfully: $TGZ"