UI page or component
Introduction
"UI page or component" is a type of External Object that is used to implement specific front components within your Simplicité instance. Thus creating custom interactive components to embed to your interfaces.
Thanks to such objects you can create dynamic elements that have custom behaviors and can seamlessly interact with Simplicité's API.
How to create
Similarly to creating any type of External Object, go to User Interface > External Object > Show all and click Create:
-
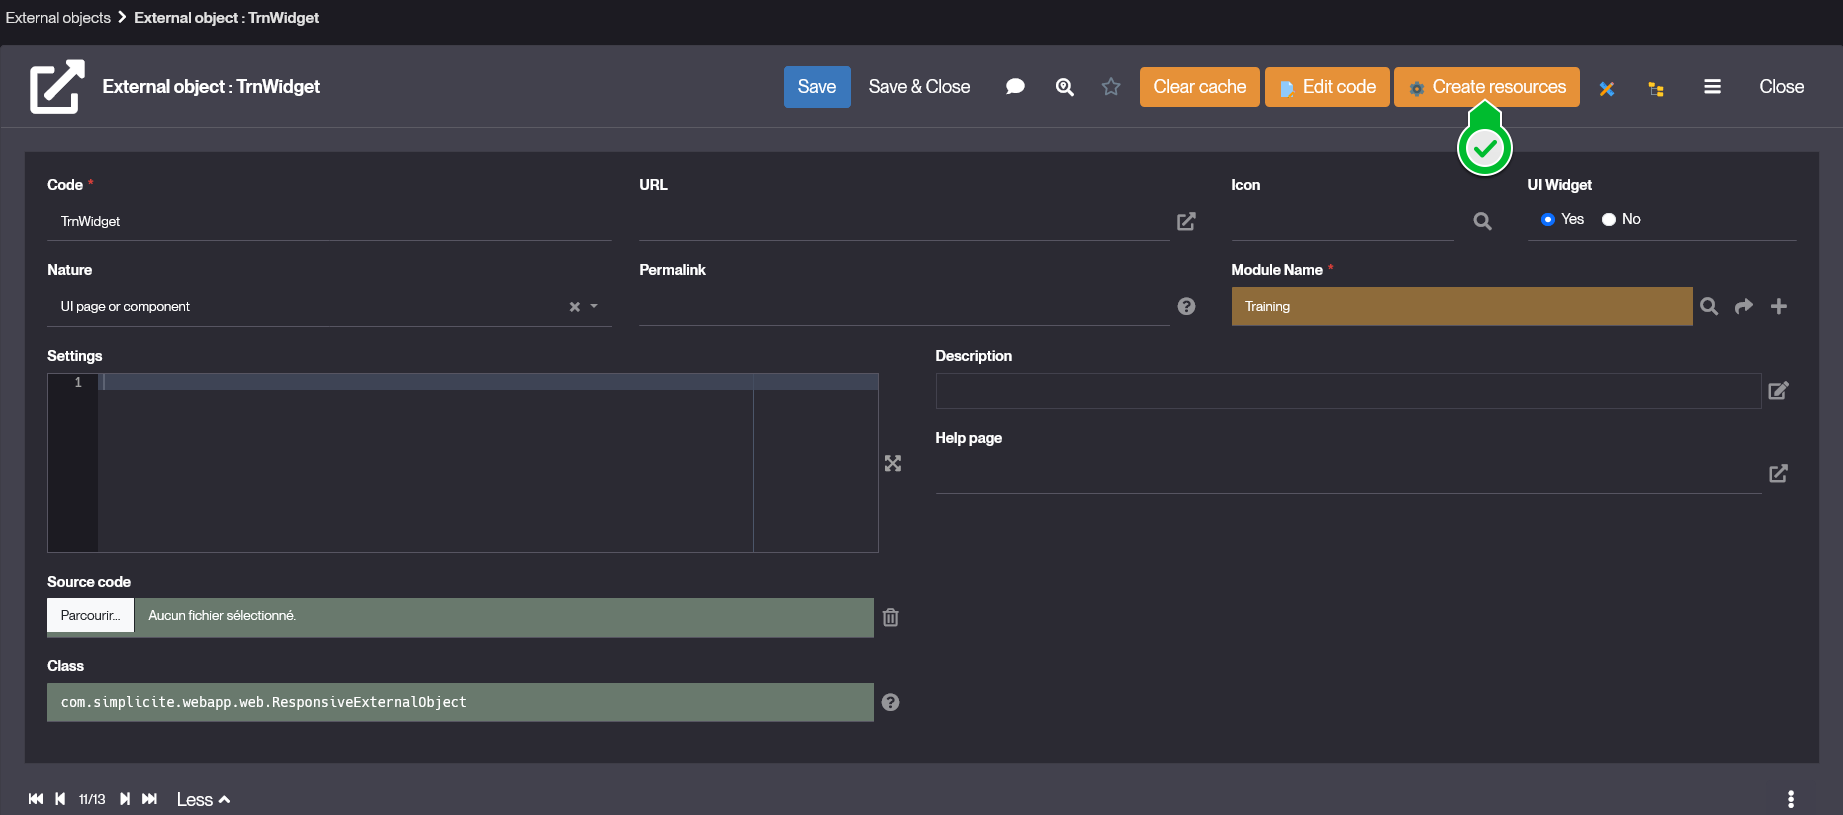
Create your object by filling at least teh mandatory fields:
- Code that is the name of your object.
While naming your objects, we highly recommend to follow the suggested nomenclature ModulePrefix + ObjectName.
- Nature set to UI page or component.
- UI Widget tells if your external object shall be considered as a widget or not, declaring wether or not it can be used in dashboard.
In both case, the component is usable in any editable view, the only difference is its possible including in dashboards.
Example values:

- Code that is the name of your object.
-
Save your object and click Create resources:

- This creates the default resources for your external object:
- HTML in which you'll define your object's content structure.
- STYLES that is your object's stylesheet.
- CLASS where the component's behavior will happen.

- See the implementation section below for how to use these resources.
- This creates the default resources for your external object:
-
Save your object, and now ensure that it has the correct rights & permissions.
-
At the bottom of your object's form, click the tab-item Permissions, and click Create.

-
In the Create Permission form, select the Primary group you want your object to be associated to, and select the Group permissions to select the specific rights for your object.
Example values:
 note
noteBy default, trying to put your object in any interface will result in a
External Object __ not grantedtext message.
:::
-
-
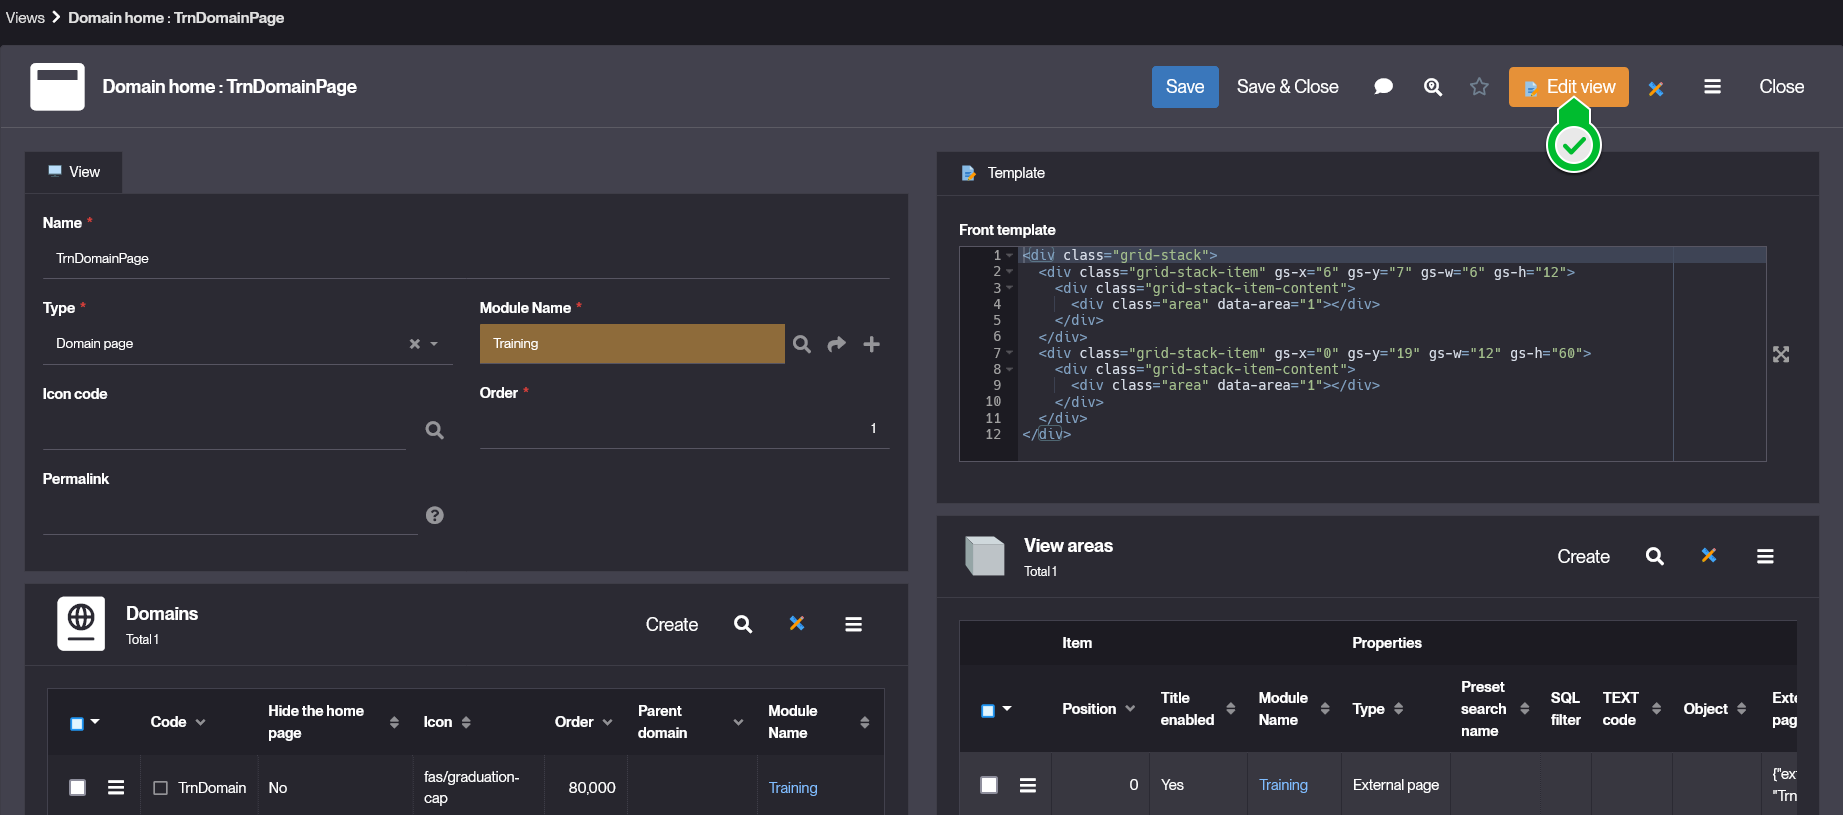
Finally, add your object to an existing View of any type.
- Go to User Interface > Views > Show all, and select the view you'd like to include your component in.

- Click Edit View in the header of the form.
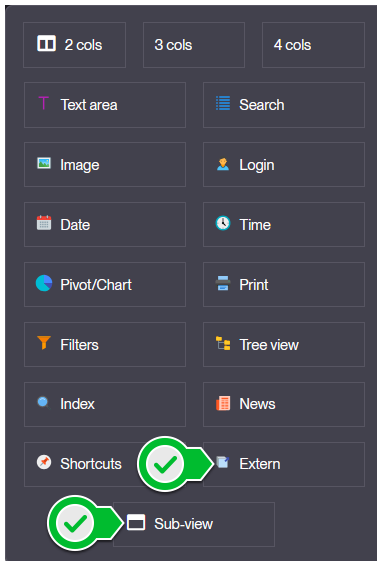
- You are now in the Template Editor, move your mouse around and click on the + button at any position.

- In the popup menu, select Sub-View or Extern.

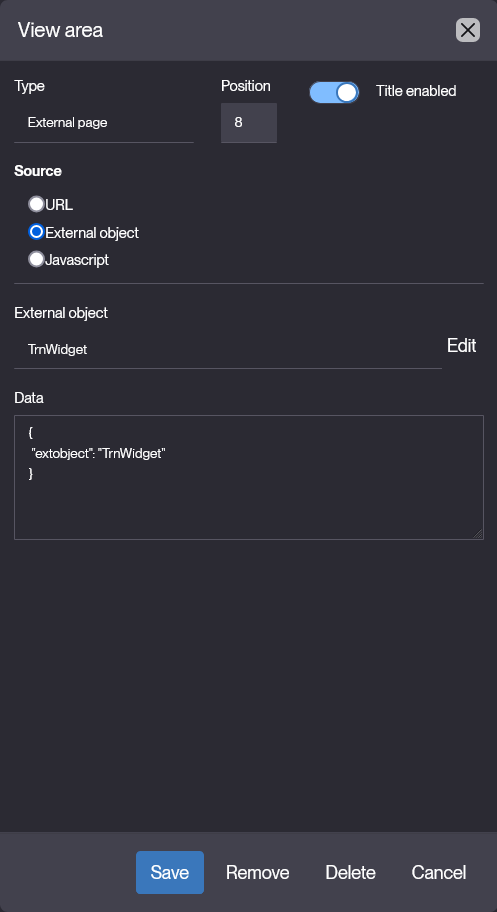
- On the Type field, select External Page.
- Set the Source to External Object and the External Page to your component's name.
Example values:

- JSON Data contains:
- the external object name
- optionally your contextual URL parameters (needed by the external object in this view)
- and fields values (only when External object definition has fields)
{
  "extobject": "UIObjectCounter",
  "params": { "myparam1": "xxx", "myparam2": "yyy" }
  "fields": {
    "uiCounterTextColor": "",
    "uiCounterFieldId__fld_name": "demoOrdTotal",
    "uiCounterObjId__obo_name": "DemoOrder",
    "uiCounterIcon": "fas/euro-sign",
    "uiCounterColor": "red",
    "uiCounterBgColor": ""
  }
} - Go to User Interface > Views > Show all, and select the view you'd like to include your component in.
-
Click Save in the modal's footer, Save in the template editor, and Save in the view's form. Then Clear your cache and by visiting your view, you should see your component.
How to implement
To actually implement custom behaviors and specific interactions for your component, you will have to dive into some web-development through the Resources of your external object.
There are 2 different categories for your external object's implementation:
-
The setup & instantiation that is done using a JavaScript
com.simplicite.webapp.web.ResponsiveExternalObjectby default- Can be overridden by a java code extending
ResponsiveExternalObjector at leastExternalObject(the main parent class).
-
The workflow and behavior that is done using the JavaScript Resource.
- JS class extending
Simplicite.UI.ExternalObject - Implementing the
render()method to handle the DOM-related instantiations. - Declaring any other custom behaviors or features.
- JS class extending
In this part the taken code examples and features will be from an unreleased widget DemoWelcomeCard (source codes are provided in the sections below).
Java instantiation
By default your component is just of Java class com.simplicite.webapp.web.ResponsiveExternalObject, but in case you need additional methods,
you can create your own Java class for your component, that will extend the mentioned one.
-
In your external object's form, click Edit Code, then Confirm.
-
You will be redirected to the code editor with the basic java setup for your component's own class.
- Yet you can click Save and Close to come back to the component's form.
-
Now instead of
com.simplicite.webapp.web.ResponsiveExternalObjectin the Class field, you have<your-object-code>.javain the Source code field.
HTML content
Here, in the HTML you will write the html content of your component, the good practice is to define only the anchors for later implementation of the content through the CLASS dynamically.
At creation the script looks like:
<div id="demowelcomecard">
</div>
With the id tag being the raw Code of your external object.
You can remove the div if you prefer, but then you have to reference your object's html using const $content = this.ctn
in the CLASS resource file, and then add elements using methods like $content.html().
Such workflow will refer directly to the default container div your external object is created within.
There are several key points to understand and keep in mind while developing in this file:
- Those elements are displayed within the
<div class="view-item item-extern"></div>element. Thus they can be targeted by existing styles and DOM constraints. - The HTML is not linked to its script with the
<script>tag, meaning you can't instantiate or call functions from the static content (the one written in the HTML).
DemoWelcomeCard code example
<div id="demowelcomecard">
    <div id="demowelcomecard-header"></div>
    <div id="demowelcomecard-actions"></div>
    <div id="demowelcomecard-productlist"></div>
</div>
CSS styles
In the STYLES resource, you will write the CSS/LESS code that defines your component's styles. Thus ensure you target the correct element from your HTML and refer to them as precisely as possible. You can implement interactive styles and use all of CSS's regular features.
At creation the stylesheet looks like:
#demowelcomecard {
    /* Custom styles */
}
There are several key points to understand and keep in mind while developing in this file:
- The written styles are gonna be merged to the overall stylesheet, so ensure you either don't use too common names for your class and id.
- You can use existing styles by simply adding specific class to your elements, but make sure you don't embed some unwanted features with it.
DemoWelcomeCard code example
#demowelcomecard {
    display: flex;
    flex-direction: column;
}

#demowelcomecard-header {
    display: flex;
    flex-direction: column;
    text-align: left;
    gap: 4px;
    width: 100%;

    & h1 {
        font-size: 32px;
        font-weight: 600;
    }
    & h3 {
        font-size: 24px;
    }
}

#demowelcomecard-actions {
    display: flex;
    flex-direction: row;
    justify-content: start;
    align-items: center;

    box-sizing: border-box;
    margin-top: 32px;
    gap: 32px;

    & .demowelcomecard-btn {
        position: relative;
        font-size: 24px;
        font-weight: 600;
        padding: 16px 32px;
        border: none;

        &::before {
            content: '';
            position: absolute;
            top: 0;
            left: 0;
            width: 4px;
            height: 100%;
            border-left: solid 4px transparent;
            transition: all 0.33s ease-in;
        }

        &:hover {
            &::before {
                border-left-width: 16px;
            }
        }
        &:active {
            &::before {
                border-left-width: 64px;
            }
        }
    }

    & #tutorial {
        background-color: rgba(84, 81, 255, 0.1);
        color: #5451FF;

        &::before {
            border-color: #5451FF;
        }
    }
    & #products {
        background-color: rgba(255, 209, 102, 0.1);
        color: #FFD166;

        &::before {
            border-color: #FFD166;
        }
    }
    & #user-infos {
        background-color: rgba(88, 236, 155, 0.1);
        color: #58EC9B;

        &::before {
            border-color: #58EC9B;
        }
    }
}

#demowelcomecard-productlist {
    display: flex;
    flex-direction: row;
    flex-wrap: wrap;
    justify-content: start;
    align-items: center;

    box-sizing: border-box;
    margin-top: 16px;
    padding: 32px;
    gap: 16px;

    & .demowelcomecard-product-card {
        position: relative;
        display: flex;
        flex-direction: row;
        box-sizing: border-box;
        padding: 16px;
        width: 40vw; /* fix this later on */
        border: solid 1px #C6C6C6;
        background: rgba(198, 198, 198, 0.25);

        & .dwc-product-card-left {
            display: flex;
            flex-direction: column;
            justify-content: space-between;
            width: 50%;
            text-align: left;

            & .dwc-product-card-left-header {
                display: flex;
                flex-direction: column;

                & .dwc-product-card-left-header-title {
                    font-size: 32px;
                    font-weight: 600;
                }
                & .dwc-product-card-left-header-subtitle {
                    font-size: 24px;
                }
            }

            & .dwc-product-card-left-footer {
                display: flex;
                flex-direction: column;

                & .dwc-product-card-left-footer-stock {
                    font-size: 16px;
                    font-style: italic;
                }
                & .dwc-product-card-left-footer-price {
                    font-size: 32px;
                    font-style: italic;
                }
            }
        }

        & .demowelcomecard-product-card-right {
            display: flex;
            flex-direction: column;
            justify-content: center;
            align-items: center;
            padding-left: 16px;
            width: 75%;
            text-align: center;
            border-left: solid 1px #C6C6C6;
            transition: all 0.33s ease;

            & .dwc-product-card-right-image {
                display: flex;
                justify-content: center;
                align-items: center;
                width: 50%;
                height: auto;
            }
            & .dwc-product-card-right-description {
                border-top: solid 1px #C6C6C6;
                display: flex;
                justify-content: center;
                align-items: center;
                padding: 16px;
                font-size: 16px;
            }
        }

        &::before {
            content: '';
            position: absolute;
            top: 0;
            left: 0;
            width: 2px;
            height: 100%;
            border-left: solid 2px #777777;
            transition: all 0.33s ease-in;
        }

        &:hover {
            background: rgba(198, 198, 198, 0.5);
            &::before {
                border-left-width: 6px;
            }
        }
        &:active {
            background: rgba(251,54,64, 0.25);
            &::before {
                border-left-width: 6px;
                border-left-color: #FB3640;
            }
        }
    }
}
JS behavior
In the CLASS resource, you will write the JS script for your component's behavior. Here you will have the possibility to use both the JSDoc for frontend operations directly in the CLASS resource's script, and to make few calls to the Java code of your component to add custom server-side operations.
By default the only call from CLASS to Java is through render() that allows for your component's correct display and instantiation.
But later on we'll see another method that allow for more custom calls: service().
At creation the script is:
Simplicite.UI.ExternalObjects.TestWebPage = class extends Simplicite.UI.ExternalObject {
    async render(params, data = {}) {
        $('#testwebpage').append('Hello world!');
    }
};
The key concepts and understanding that you need are:
- Every instantiation has to be within the
async render(){ ... } - You can work with Simplicité's API and core library using several entry points such
as
$ui,$appor$grant(documented in the Ajax library). - You can manipulate most of the _*BusinessObjects and elements through the
BusinessObject.search( function() {...} )method.
You may need to implement some behaviors and features specifically on the server-side (though in the java code). Such workflow is required when you don't want to share information with the front (public) or you just want the calculations to be done by the backend.
-
JavaScript: make a call to the service hook, and pass the and data needed as arguments.
const res = await this.service(data, 'json');
console.log(res.result); -
Java: declare the logic for the object's service hook:
public class _ extends com.simplicite.webapp.web.ResponsiveExternalObject {
    // ...
    @Override
    public Object service(Parameters params) {
        // parse params here
        JSONObject body = params.getJSONObject();

        // implemented custom logic
        String text = /* ... */ ;

        return new JSONObject().put("result", text);
    }
}
service() code example (js)
Simplicite.UI.ExternalObjects._ = class extends Simplicite.UI.ExternalObject {
    async render(params, data = {}) {
        // Send as parameter
        $('#apptestbackendservice-param').on('click', async _ => {
            const data = { text: $('#apptestbackendservice-text').val() };
            const res = await this.service(data);
            console.log(`Result: ${JSON.stringify(res)}`);
            $('#apptestbackendservice-result').append(`${res.result}\n`);
        });

        // Send as JSON body
        $('#apptestbackendservice-body').on('click', async _ => {
            const data = { text: $('#apptestbackendservice-text').val() };
            const res = await this.service(JSON.stringify(data), { contentType: 'application/json' });
            console.log(`Result: ${JSON.stringify(res)}`);
            $('#apptestbackendservice-result').append(`${res.result}\n`);
        });
    }
};
service() code example (java)
package com.simplicite.extobjects.Application;

import org.json.JSONObject;

import com.simplicite.util.AppLog;
import com.simplicite.util.tools.Parameters;

public class _ extends com.simplicite.webapp.web.ResponsiveExternalObject {
    private static final long serialVersionUID = 1L;

    @Override
    public Object service(Parameters params) {
        JSONObject body = params.getJSONObject();

        String txt = "[" + (body != null
            ? body.optString("text") + "] from JSON body"
            : params.getParameter("text") + "] from parameter");

        return new JSONObject().put("result", txt);
    }
}
DemoWelcomeCard code example
Simplicite.UI.ExternalObjects.DemoWelcomeCard = class extends Simplicite.UI.ExternalObject {
    async render(params, data = {})
    {
        let app = $ui.getApp();
        let product = app.getBusinessObject("DemoProduct");
        let user = app.getBusinessObject("User");
        let login = $ui.getGrant().login;


        $("#demowelcomecard-header")
            .append($('<h1>').text("Welcome to Simplicité's Demo !"))
            .append($('<h3>').text("We're excited to have you onboard. Explore, interact, and enjoy your experience with us !"));

        $("#demowelcomecard-actions")
            .append($('<button/>').text("Check the Tutorial").attr("id", "tutorial").addClass("demowelcomecard-btn").on("click", () => { window.open("https://docs.simplicite.io/", "_blank"); } ))
            .append($('<button/>').text("Display Products").attr("id","products").addClass("demowelcomecard-btn").on("click", () => {
                let b = document.getElementById("demowelcomecard-productlist").hidden;
                document.getElementById("demowelcomecard-productlist").hidden = !b;
            } ))
            .append($('<button/>').text("See my Infos").attr("id","user-infos").addClass("demowelcomecard-btn").on("click", () => {
                user.search( function(){
                    const usr = user.list.find(u => u.usr_login === login);

                    if (usr && usr.row_id) {
                        $ui.displayForm(null, "User", usr.row_id, {
                            nav: "add",
                            target: "work"
                        });
                    } else {
                        console.error("User not found.");
                    }
                }, null, {});
            } ));

        product.search(function() {
            for (let i=0; i<product.count; i++)
            {
                const prd = product.list[i];
                const imageSource = `data:${prd.demoPrdPicture.mime};base64,${prd.demoPrdPicture.content}`;

                let productDiv = $('<div>').addClass("demowelcomecard-product-card").on("click", () => {
                    // triggers an error but still saves & runs ...
                    $ui.displayForm(null, "DemoProduct", prd.row_id, {
                        nav: "add",
                        target: "work"
                    });
                });

                let cardLeft = $('<div>').addClass("dwc-product-card-left");

                let cardLeftHeader = $('<div>').addClass("dwc-product-card-left-header");
                let cardLeftHeaderTitle = $('<span>').addClass("dwc-product-card-left-header-title").text(prd.demoPrdName);
                let cardLeftHeaderSubtitle = $('<span>').addClass("dwc-product-card-left-header-subtitle").text(prd.demoPrdSupId__demoSupName+" - "+prd.demoPrdType);

                cardLeftHeader
                    .append(cardLeftHeaderTitle)
                    .append(cardLeftHeaderSubtitle);

                let cardLeftFooter = $('<div>').addClass("dwc-product-card-left-footer");
                let cardLeftFooterStock = $('<span>').addClass("dwc-product-card-left-footer-stock").text(prd.demoPrdStock+" left in stock.");
                let cardLeftFooterPrice = $('<span>').addClass("dwc-product-card-left-footer-price").text(prd.demoPrdUnitPrice+"€");

                cardLeftFooter
                    .append(cardLeftFooterStock)
                    .append(cardLeftFooterPrice);

                cardLeft
                    .append(cardLeftHeader)
                    .append(cardLeftFooter);

                let cardRight = $('<div>').addClass("demowelcomecard-product-card-right");

                let cardRightImage = $('<img/>').addClass("dwc-product-card-right-image").attr("src", imageSource).attr("alt", prd.demoPrdName);
                let cardRightText = $('<span>').addClass("dwc-product-card-right-description").text('"'+prd.demoPrdDescription+'"');


                cardRight
                    .append(cardRightImage)
                    .append(cardRightText);

                productDiv
                    .append(cardLeft)
                    .append(cardRight);

                $("#demowelcomecard-productlist").append(productDiv);
            }

            $("#demowelcomecard-productlist").attr("hidden", "true"); // hiding by default

        }, null, { inlineDocs: true });
    }
};
Configuration
| Field | Description |
|---|---|
| Code | External Object's unique identifier |
| Nature | Type of the External Object, here UI page or component |
| Source Code | Java code for customized server-side behaviors |
| Class | Extended class for the Java code, here com.simplicite.webapp.web.ResponsiveExternalObject |
| Icon | External Object's logo |
| UI Widget | Indicates if this element shall be considered as a Widget or not. |
Read More
- Widgets already implemented within Simplicité's Demo module.
- Code Examples
- JSDoc
- Javadoc
JS Dev: